In this blog, we’ll implement the AWS Client VPN endpoint. I will detail the exact implementation steps, primarily because VPN technology-based knowledge is essential in many domains, like solutions architecture, DevOps, security and so on. If you have VPN knowledge and configuration-related knowledge, it’ll help your a great deal in your career. And this is one of the reasons why I wanted to focus on this in more detail.
AWS Client VPN Authentication
Now, when you discuss the AWS Client VPN, do know that there are multiple ways the authentication would work. Below are the three ways of authentication which client VPN offers:
- Active directory authentication: First, you can go ahead and specify the user credentials through the active directory authentication.
- Mutual authentication: In mutual authentication, we have a certificate-based approach.
- Single Sign-on: The third one is based on the Single Sign-On, which uses SAML-based federation authentication.
So what we will be doing, since we do not really have an active directory setup, we do not really have a Single Sign-On based setup, we will be going with a straightforward mutual authentication-based approach.
Video Tutorial – Part 1 and 2
Mutual authentication for client VPN
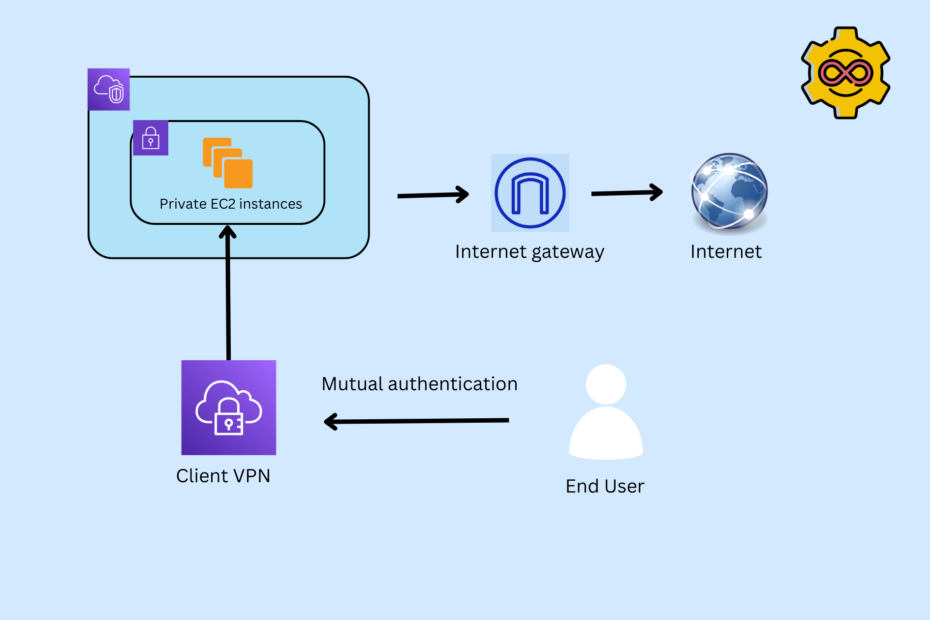
Mutual authentication, also referred to as two-way authentication, is a security process in which the entities authenticate each other before the actual communication occurs.
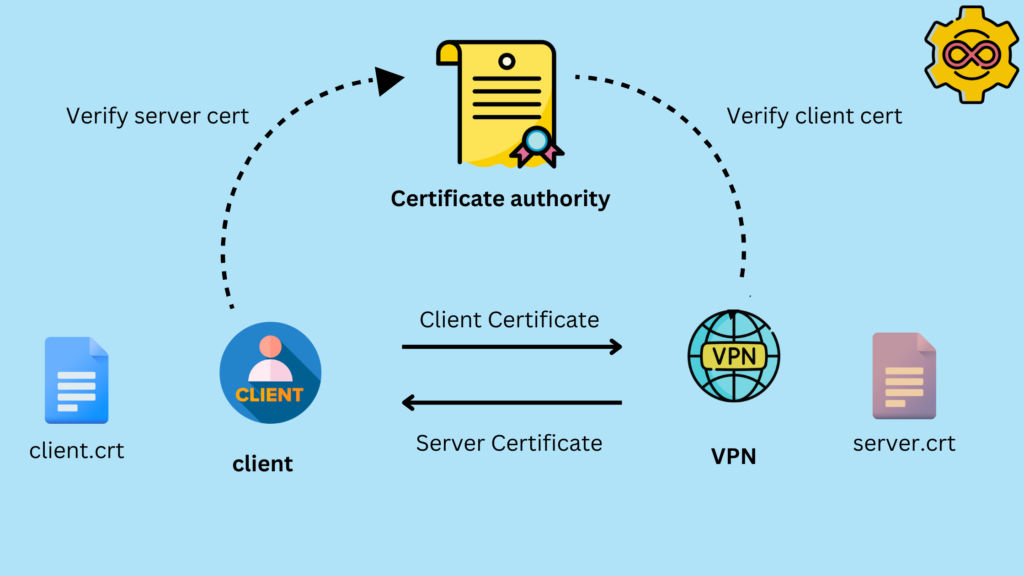
So what really happens here is that you have a client and you have a VPN. Now, both of them will have a certificate. The client will have a client certificate, the server will have a server certificate, and you have a certificate authority. And this certificate authority basically has issued both of these certificates. The client, when connecting to the VPN, will provide the client certificate. The server will go ahead and provide the server certificate, and both of them will be verified against the certificate authority that issued both of these certificates.
So in the network environment where mutual authentication is introduced, this requires that both the client and the server must provide a digital certificate to provide their identities.
Step 1: Generate certificates
In this approach, the first step is to generate the certificates.
There will be three certificates that will be required.
- CA certificate,
- The server certificate, and
- The client certificate.
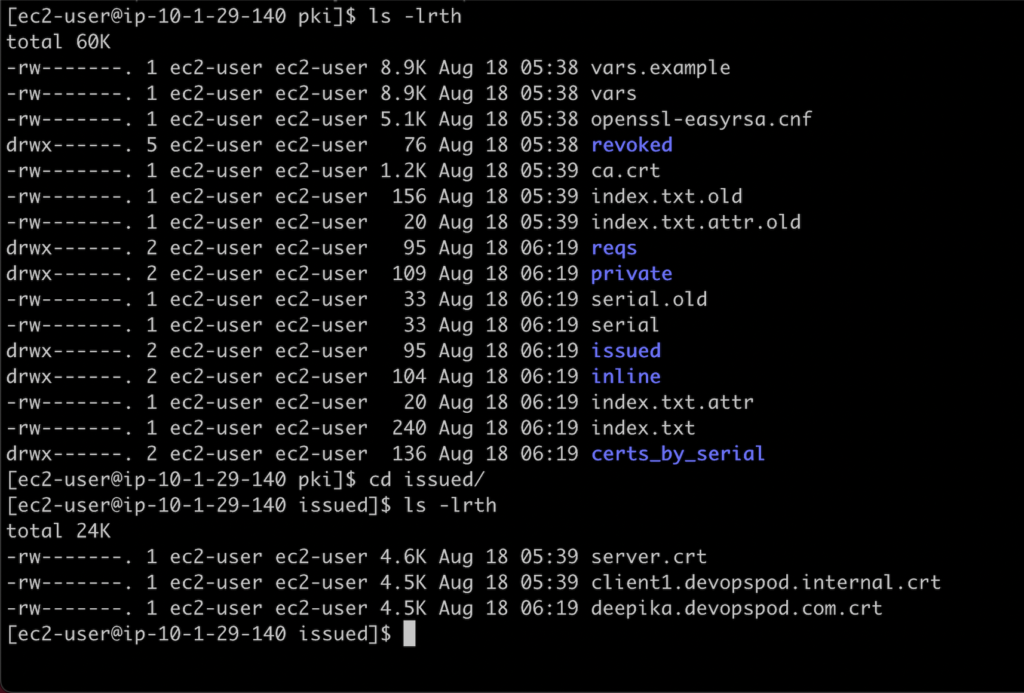
We’ll be creating a certificate authority certificate. Once the CA certificate is created, from the CA certificate, we will issue the server certificate and the client certificate. The server certificate will be associated with the Client VPN endpoints, and the client certificate we will be downloading in our local machine, so that when we connect to the Client VPN, we can make use of this client certificate.
Below are the commands to be followed on a Linux machine or an EC2 instance.
#Install git if not already installed
sudo yum -y install git

#Clone the openvpn easy RSA-based project
git clone https://github.com/OpenVPN/easy-rsa.git

#Enter the directory
cd easy-rsa/easyrsa3

#Initialize
./easyrsa init-pki

#Create our CA certificate
./easyrsa build-ca nopass

#Create our server certificate
./easyrsa build-server-full server nopass

#Create our client certificate
./easyrsa build-client-full client1.devopspod.internal nopass
All of these certificates are stored in this PKI directory. In the next step, we’ll copy all the certificates and associated keys into a central folder.
#Create a new directory
mkdir ~/certs/

#Copy the certs to new directory
cp pki/ca.crt ~/certs/
cp pki/issued/server.crt ~/certs/
cp pki/private/server.key ~/certs/
cp pki/issued/client1.devopspod.internal.crt ~/certs
cp pki/private/client1.devopspod.internal.key ~/certs/

#Enter the directory
cd ~/certs/
Step 2: Upload certificates to ACM
The Client VPN endpoint only supports the certificates that are part of the ACM. So this is one of the important steps that needs to be done. Now there are multiple ways in which you can upload the certificates to ACM. We are using the AWS cli to upload the certificate.
Note: If you have not configured the AWS cli, and the instance is not authorized to use the certificate manager service, it would throw an error. To upload the certificate to ACM we need to run aws configure and provide the access and secret keys.
aws acm import-certificate --certificate fileb://server.crt --private-key fileb://server.key --certificate-chain fileb://ca.crt --region us-east-1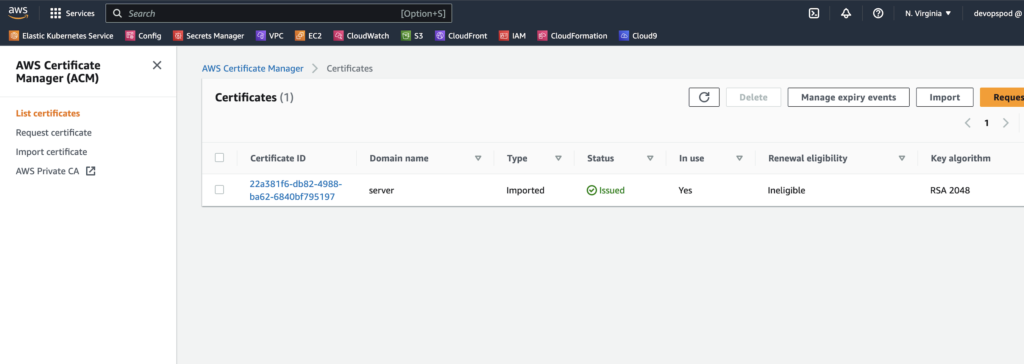
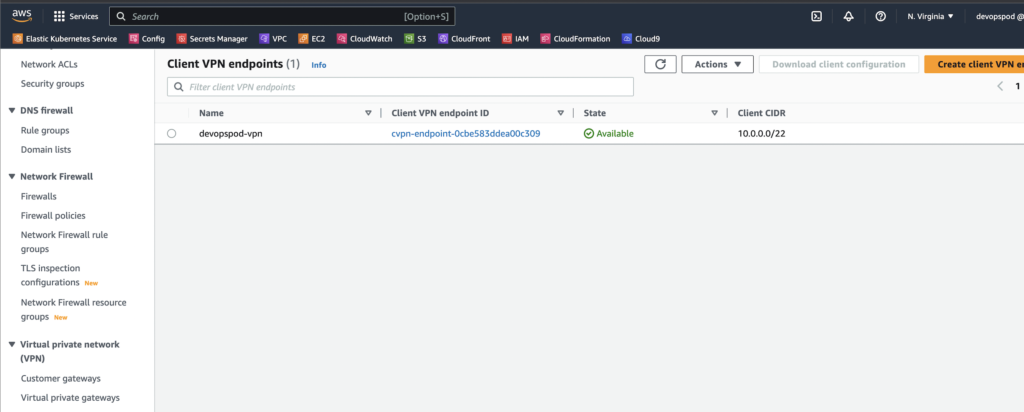
Step 3: Create a Client VPN endpoint
Creating the Client VPN endpoint is a pivotal step in establishing secure and controlled remote access to your AWS resources. In this step, we will delve deeper into the process of setting up the Client VPN endpoint, covering important parameters and considerations.
3.1 Configuring the Client VPN Endpoint:
To get started, navigate to the AWS Management Console and open the VPC Dashboard. Here’s a detailed breakdown of the configuration process:
- Endpoint Name: Give your Client VPN endpoint a meaningful name that reflects its purpose. For example, you could name it “DemoClientVPN.”
- Client IPv4 CIDR: Define the range of IP addresses that will be assigned to connecting clients. This range should be specified in CIDR notation, such as “10.0.0.0/22.” These are the addresses from which clients will establish connections.
- Authentication Methods: Choose the authentication method for connecting clients. Since we’re focusing on mutual authentication, select “Mutual authentication.”
3.2 Certificate ARNs:
Here’s where the previously generated certificates come into play. You’ll need the Amazon Resource Name (ARN) of the server certificate and the client certificate from the AWS Certificate Manager (ACM). This step binds the certificates to the VPN endpoint for secure communication.
- Server Certificate ARN: Provide the ARN of the server certificate uploaded to ACM. This certificate will be presented to connecting clients to verify the server’s identity.
- Client Certificate ARN: Similarly, enter the ARN of the client certificate uploaded to ACM. This certificate will be presented by clients to authenticate themselves to the server.
3.3 Other Parameters:
While there are additional optional parameters available for customization, we’ll focus on the essentials:
- Connection Logging: You can enable or disable logging for VPN connections. Logging can be useful for monitoring and troubleshooting purposes.
- DNS Server IP: Specify the DNS server IP address that clients should use for name resolution. This can be helpful for accessing resources by hostname.
- Transport Protocol: Choose the transport protocol for VPN connections. The default is UDP, but you can also choose TCP for more reliable connections.
3.4 Completing the Configuration:
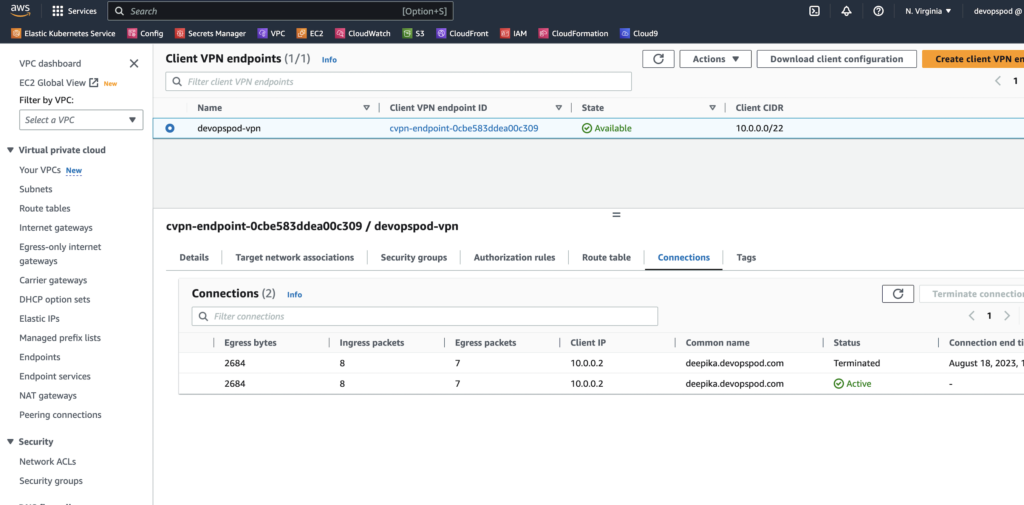
Once you’ve filled in all the necessary information, click the “Create Client VPN Endpoint” button. The endpoint will be created and its status will transition from “pending associate” to “available.”
3.5 Verifying the Endpoint Status:
Before proceeding further, ensure that the Client VPN endpoint’s status is “available.” This indicates that the endpoint is ready to accept connections.
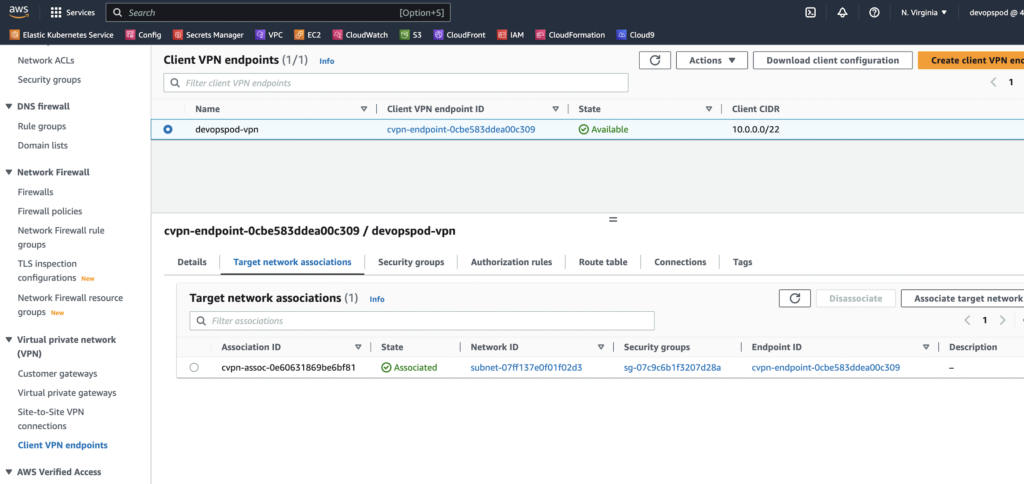
Step 4: Association
The next step involves associating the Client VPN endpoint with the desired VPC and subnets. This determines the network in which the VPN endpoint operates and controls which resources clients can access.
- VPC ID: Choose the VPC to associate with the VPN endpoint. This VPC contains the resources you want remote clients to access.
- Subnet Associations: Select the specific subnets within the chosen VPC that will be accessible to clients. You can choose multiple subnets to provide a range of access.
With the Client VPN endpoint successfully created, configured, and associated with the desired VPC and subnets, we have established the foundation for secure remote access. This endpoint acts as a gateway for clients to connect to resources within the specified VPC while maintaining strong authentication and encryption measures.
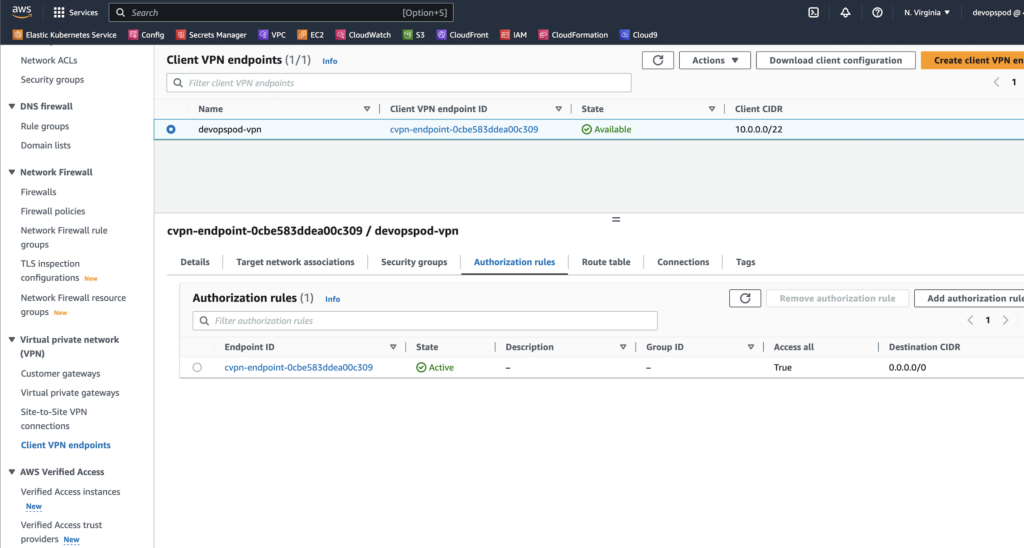
Step 5: Authorization
After setting up the Client VPN endpoint, the next critical step is authorizing access. This process ensures that clients are granted appropriate permissions to access specific resources within the associated VPC. In this step, we’ll dive deeper into the concept of authorization and explore how to configure authorization rules effectively.
5.1 Understanding Authorization:
Authorization plays a vital role in controlling who can access which resources through the Client VPN endpoint. With the use of authorization rules, you can define access permissions based on various criteria, such as user roles, groups, or source IP addresses.
5.2 Configuring Authorization Rules:
Here’s a breakdown of the steps involved in configuring authorization rules:
- Destination Networks: Specify the destination networks or subnets that clients are allowed to access. This is defined using CIDR notation. For example, “10.0.0.0/16” could represent a specific subnet.
- Grant Access To: Determine who should be granted access to the specified destination networks. You have two options: All Users or a specific Access Group.
5.3 Use Cases:
Let’s explore a couple of use cases to illustrate the significance of authorization:
- Wide Access and Restricted Access: Imagine your VPC has two subnets: a general subnet and a sensitive subnet. You can create an authorization rule that grants access to “All Users” for the general subnet, allowing everyone to access less sensitive resources. Meanwhile, you can create another rule that grants access only to an “Admins” Access Group for the sensitive subnet, ensuring that only authorized personnel can access critical resources.
- Role-Based Access: Suppose your organization has different departments, each requiring access to specific resources. You can create authorization rules that grant access based on users’ roles. For instance, a “Development” group might be allowed access to development servers, while an “Operations” group could access production servers.
5.4 Adding Authorization Rules:
Here’s how you can add authorization rules to your Client VPN endpoint:
- Navigate to the AWS Management Console and access your Client VPN endpoint’s configuration page.
- Locate the “Authorization” section and click “Add authorization rule.”
- Specify the destination networks using CIDR notation. For example, “10.0.0.0/24.”
- Choose whether to grant access to “All Users” or a specific Access Group.
- Click “Add Authorization Rule” to save the rule.
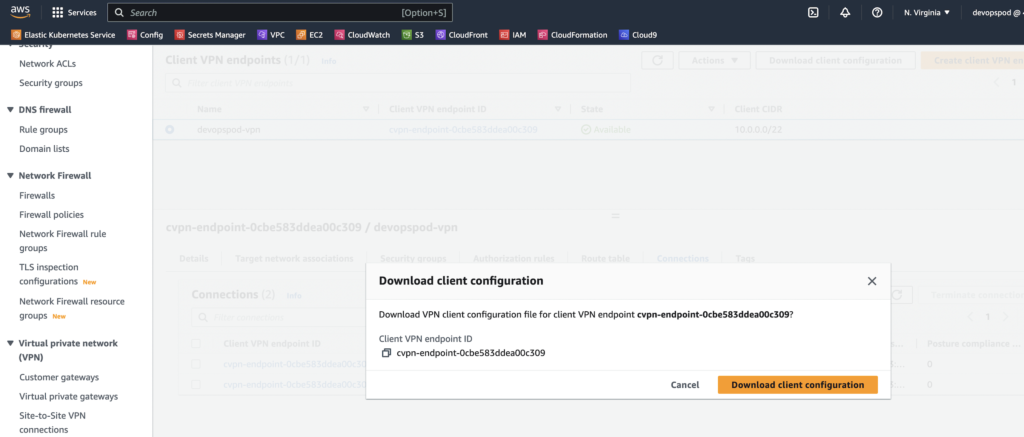
Step 6: Download the configuration file
In this step, we’ll delve into the process of downloading the VPN configuration file, which is a crucial component for connecting to the Client VPN endpoint. This configuration file contains essential information that enables the client software to establish a secure and authenticated connection.
6.1 Importance of the VPN Configuration File:
The VPN configuration file serves as a blueprint for the connection setup between the client and the Client VPN endpoint. It includes critical details such as:
- Server hostname or IP address
- Authentication details and certificates
- VPN protocol and port
- DNS server information
This file ensures that the client has the necessary parameters to establish a secure connection and authenticate itself to the endpoint.
6.2 Steps to Download the VPN Configuration File:
Here’s how you can download the VPN configuration file:
- Access the AWS Management Console and navigate to your Client VPN endpoint’s configuration page.
- Locate the “Download Client Configuration” option and click on it.
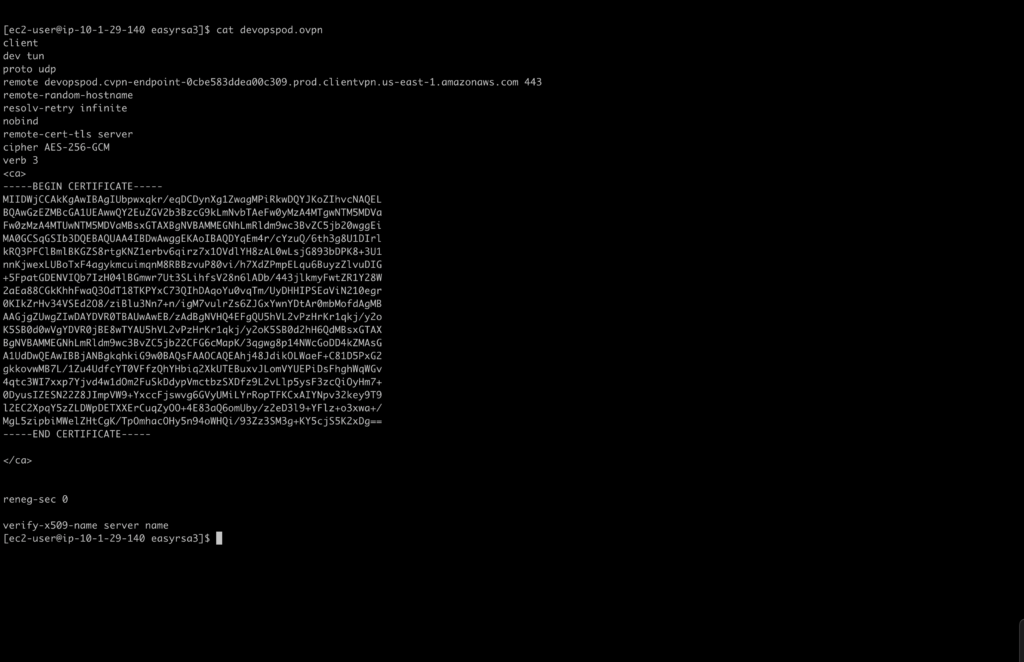
- The configuration file, typically named,
client-config.ovpnwill be downloaded to your device.
6.3 Analyzing the Configuration File:
Open the downloaded configuration file using a text editor to understand its structure and contents. This file includes various sections that provide the necessary information for establishing a connection:
- Certificates and Keys: The file contains the certificate and key data for mutual authentication. These certificates are used by the client and the server to verify each other’s identities.
- Server Configuration: This section includes details like the server’s IP address, port number, and VPN protocol (UDP or TCP).
- Route Information: The file may also include routing information to direct traffic through the VPN tunnel.
Step 7: Create a central configuration file
7.1 Importance of the Central Configuration File:
The central configuration file serves as a unified setup for connecting to the Client VPN endpoint. By combining the client certificate, client key, and server configuration into a single file, the setup becomes more streamlined and manageable.
7.2 Steps to Create the Central Configuration File:
Here’s how you can create the central configuration file:
- Open the configuration file (
client-config.ovpn) that you downloaded in the previous step using a text editor. - Locate the sections in the configuration file where the client certificate (
<cert>...</cert>) and client key (<key>...</key>) are specified. - Copy the entire content within the
<cert>...</cert>and<key>...</key>sections. - Open a new text file in the same directory and paste the copied certificate and key content.
- Copy the entire server configuration from the original configuration file and paste it into the new text file. This includes the server’s IP address, port number, VPN protocol, and other settings.
- If needed, you can also customize the DNS server settings or other parameters.
- Save the new text file with a meaningful name, such as
central-config.ovpn. This file now contains all the necessary components for the connection.
6.5 Keeping the Configuration File Secure:
Since the VPN configuration file contains sensitive information, it’s crucial to keep it secure. Avoid sharing this file with unauthorized individuals and store it in a secure location on your device.
6.6 Using the Configuration File:
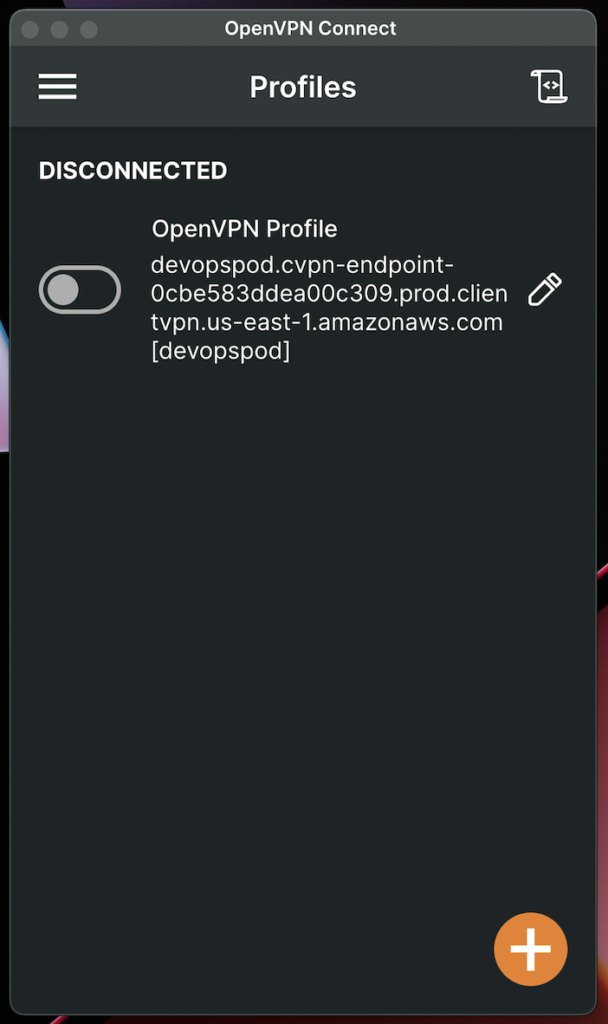
The next step after downloading the configuration file is to use it with the appropriate client software. In our case, we’ll be using the OpenVPN Connect client software. Import the configuration file into the client software to initiate the connection.
We can also automate the process with the below sample script. The execution of this script will create a VPN user with the certificate, key and the .ovpn file which can be used by your team separately to connect to the client.
We can version control this script along with the certificates so that we have track of it.
#!/usr/bin/env bash

set -e
DOMAIN=".devopspod.com"
USER=$1
PASSWORD=$2

function create_config_zip() {
  rm -rf $USER
  mkdir $USER
  cp pki/issued/$USER$DOMAIN.crt $USER
  cp pki/private/$USER$DOMAIN.key $USER
  cp devopspod.ovpn $USER
  echo "" >> $USER/devopspod.ovpn
  echo "cert ./$USER$DOMAIN.crt" >> $USER/devopspod.ovpn
  echo "key ./$USER$DOMAIN.key" >> $USER/devopspod.ovpn
  # zip -j -e -r config-$USER.zip $USER
  zip -j -e -r config-$USER.zip $USER -P $PASSWORD
  rm -rf $USER
}

if [[ "$USER" == "" ]]; then
  echo "User cannot be blank."
  exit 1
fi

if [[ ! -f "pki/private/$USER$DOMAIN.key" ]]; then
  ./easyrsa build-client-full $USER$DOMAIN nopass
fi
create_config_zip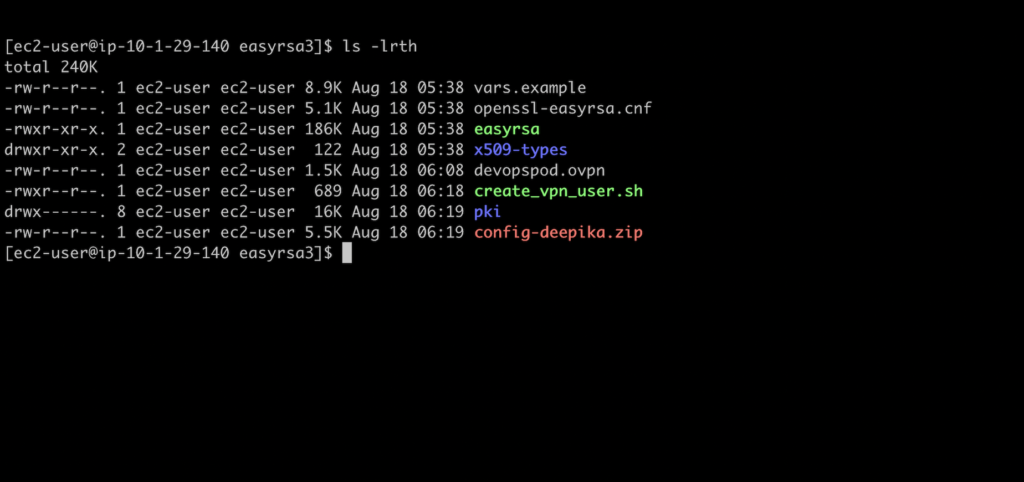
Step 8: Connecting to the Client VPN Endpoint:
8.1 Steps to Connect:
Here’s how you can connect to the Client VPN endpoint:
- Open the OpenVPN Connect client software that you previously downloaded and installed.
- Locate the “Import” or “Add” option within the software. This is where you’ll import the central configuration file that you created earlier (
central-config.ovpn). - Browse to the directory where you saved the central configuration file, select it, and click “Import” or “Add.”
- The software will now display the imported configuration file as an available connection option.
- Click on the imported configuration to initiate the connection.
- The software will prompt you to enter your VPN credentials, which typically include a username and password.
- After entering the credentials, the software will establish a secure connection to the Client VPN endpoint.
- Once connected, you should see a confirmation that the VPN connection is active.
8.2 Verifying the Connection:
After successfully connecting to the Client VPN endpoint, it’s essential to verify the connection’s functionality. Here’s what you can do to ensure everything is working as expected:
- Access resources within the associated VPC: Try connecting to servers, databases, or other resources that are only accessible within the VPC. This confirms that the VPN is routing traffic correctly.
- Test internet access: While connected to the VPN, try accessing external websites to ensure that internet traffic is correctly routed through your regular network connection.
- Monitor the VPN status: Keep an eye on the OpenVPN Connect client software to ensure that the connection remains active.
8.3 Disconnecting:
When you’re done using the VPN, you can disconnect using the OpenVPN Connect client software. Simply locate the option to disconnect within the software, and it will terminate the secure connection.
8.4 Importance of Secure Disconnection:
Just as connecting securely is essential, disconnecting securely is equally important. Always remember to disconnect from the VPN when you’re finished accessing resources within the VPC. This ensures that your device is no longer routing traffic through the VPN tunnel and that your network resources are protected.
8.5 Ensuring Regular Updates:
It’s good practice to keep the OpenVPN Connect client software up to date with the latest versions and security patches. Regular updates help ensure that you’re benefiting from the latest features and security enhancements.
Step 9: Ensuring Proper Routing:
I have opted for OpenVPN. However, there are many other software that can be used for connecting to the VPN.
In this step, we’ll focus on the crucial aspect of ensuring proper routing when using the AWS Client VPN endpoint. Routing plays a fundamental role in directing network traffic between the client’s device and the resources within the Virtual Private Cloud (VPC).
9.1 The Importance of Routing:
Routing ensures that data packets from the client’s device are correctly directed to their intended destinations within the VPC. Proper routing ensures that the client can access resources securely and efficiently, whether they are located within the VPC or on the internet.
9.2 How Routing Works:
When a client connects to the AWS Client VPN endpoint, the routing tables are dynamically updated to route traffic through the VPN tunnel. This ensures that traffic between the client and the VPC is encrypted and secured.
9.3 Verifying Routing Configuration:
It’s essential to verify that routing is configured correctly to ensure a seamless experience. Here’s how you can do that:
- Access Internal Resources: While connected to the VPN, try accessing resources within the VPC that are not accessible from outside the VPC. For example, connect to internal servers, databases, or services. Successful access confirms that the VPN is routing traffic properly.
- Test Internet Access: Verify that you can still access external resources on the internet while connected to the VPN. Internet-bound traffic should exit the VPN tunnel and use your regular network connection.
- Monitor Routing Table Changes: Observe the changes in the routing table when you connect to the VPN. Pay attention to routes added or modified to ensure that traffic is being directed correctly.

9.4 Handling Complex Scenarios:
In more complex network setups, you might need to configure custom routes to direct traffic to specific destinations. This is particularly important if you have multiple VPCs, cross-region connectivity, or unique networking requirements.
9.5 Troubleshooting Routing Issues:
If you encounter routing issues, consider the following troubleshooting steps:
- Check Routing Tables: Ensure that the route tables associated with your subnets have the appropriate entries for the VPN connection.
- Subnet Associations: Confirm that the Client VPN endpoint is associated with the correct subnets within your VPC.
- Security Groups: Verify that security group rules allow the necessary traffic to flow between the client and the resources in the VPC.
- VPC Peering and Transit Gateways: If your network is more complex, ensure that VPC peering or transit gateways are properly configured for traffic flow.
Conclusion
By following this comprehensive step-by-step guide, you’ve now successfully implemented an AWS Client VPN endpoint. This knowledge equips you with a valuable skillset applicable across various professional domains. Whether you’re a solutions architect, DevOps professional, or security expert, understanding VPN technology and its implementation can propel your career to new heights.
For more such content, please subscribe to Devopspod and subscribe to our YouTube channel.